
Chapter 3 – Reversing DoSvc C++ using Ghidra – Part 1
In this chapter, we’ll finally get started on my favorite part: the reversing phase. Reversing is like looking for a needle in a haystack, so prepare yourselves, because things are about to get technical.
Introduction
This chapter has two main goals:
- To provide beginner reversers with a glimpse into how we approach reversing in general, and Ghidra in particular.
- To serve as an introduction to C++ reversing.
At this stage of the research, we will reverse ‘DoSvc.dll’, which was found in the black box phase; this is the service that manages all the Delivery Optimization features,. The DLL is compiled from modern C++ code, so get ready for a deep dive into STL (Standard Template Library) objects.
There are two main reversing tools: IDA Pro, and Ghidra.
- IDA Pro is a commercial product, and it’s considered to be the standard, unrivaled reversing program.
- Ghidra is a reversing tool developed by the NSA, and was made public and open source in 2019. As I already have experience with IDA, I chose to conduct my research using Ghidra, to see how it compares.
Working under the assumption that you have a basic understanding of reversing, and rudimentary modern C++ skills, we’ll start slow, by first fully understanding a class method stage by stage, and then showing the potential of Ghidra for C++ reversing. We’ll gradually quicken the pace, and in the second part of Chapter 2, we’ll continue to describe some of the DoSvc structure and C++ classes, without digressing into the full reversing process.
Goals
Before we dive into the reversing process, it’s important to decisively define the goals of our research. This is a tip not usually written about, but in my opinion it’s one of the keystones of a good researcher. Having clear goals is important in any project, and even more so when it comes to reversing. It’s too easy to lose yourself in the reversing, jumping from function to function in an endless hopeless loop. Having goals keeps you focused on the right path.
In general, our strategic goal is to find CVEs or exploitation techniques, but such a goal is too amorphic to guide us. Let’s break it down to practical goals. For this reversing task, we want to accomplish the following:
- Understand the peer-to-peer protocol: In the previous chapter, we discovered a binary protocol used by Delivery Optimization to share files between machines; our goal is to understand the protocol. That’s too general … more precisely, our goal will be to find the code that is responsible for parsing the protocol buffer.
- Obtain a general understanding of the code, for future fuzzing: For the next fuzzing stage, we need a general grasp of the code, so we can select areas of the code to fuzz.
While the first goal demands specific, almost surgical precision, the second goal requires going over many functions and classes, and reviewing the code as a whole.
Finding the balance between these goals helped me greatly during my research. I naturally digressed into trying to understand everything, but managed to stay focused on the network components.
Initial vector
The task of starting to reverse a binary can be overwhelming. There are thousands of functions, so the question arises: where to begin?
One approach is to start from the beginning. For example, for EXE files, you can start at the main function, and for DLL files – like our ‘DoSvc.dll’ – you can start with their exported functions. However, with large programs, this approach can be somewhat tedious, as you might have to slowly make your way through multiple sections of code before reaching anything of interest.
It’s always important to start from the strings view, looking for important strings found in the binary, and identifying where they are used. But even that can be overwhelming. I wonder, is there a hint that can point us in the right direction?
In the previous chapter, when viewing the protocol in Wireshark, the only readable string was ‘Swarm protocol’, which was sent both ways at the beginning. Everything else is binary (at this point 😉).

I decided to begin by searching for the string as a lead, and fortunately, I found it!


Awesome, the string exists in our binary. Looking for usages, I found the string used in a function named ‘CPeerSock::SendHandshake’.
Note:
We know the function name from the symbols, which Microsoft kindly publishes for all the Windows binaries. See the “Reversing Windows C++ with Ghidra” guide.
CPeerSock::SendHandshake
Let’s take a look at the function found using the string. I know, it doesn’t look like much right now, but don’t worry, when we return to it in the end it will look quite different.
Before and after editing:


The function is called ‘SendHandshake’! Cool, we can learn from this name that the string we saw in Wireshark being sent both ways is part of the protocol handshake! It appears that the function builds a buffer that is sent at the end of the function (line 58) via the ‘CPeerSock::_SendMsg‘ method. This definitely looks like the right place, so let’s dive into the function.
Function signature
Starting from the top, it would help first to understand the parameters. We will attempt to understand all parameters, but as with any reversing short-term goal, I recommend not over-committing, as you could find yourself deep inside a rabbit hole. For example, it’s easy to slip into recursion when looking for usages, and find a function that passes its own parameter to our function. Sometimes, pursuing this particular rabbit is worth it, sometimes it isn’t: the important part is to be aware of the danger of descending too deeply into a rabbit hole.
In the function signature, the first parameter is ‘this’. Ghidra notes from the symbols that this function uses the ‘thiscall’ calling convention, and that its type is ‘CPeerSock’.

Note:
Without symbols, Ghidra would assume fastcall, treating the first parameter as any other parameter. In such a case, the calling convention should be edited in the function signature (see “Reversing Windows C++ with Ghidra” guide).
Surprisingly, the second parameter (after ‘this’) isn’t used at all. Perhaps this is a decompiler bug. Let’s view the assembly to find out. The second variable is RDX, and we can see that it’s overwritten without previous usage at the beginning of the code. I gave it the inspiring name: ‘unreferenced’.

The symbols tell us that the last two parameters are of types ‘CSwarmHash’ and ‘CPeerId’, respectively. For now, we won’t dive too deeply into these classes, but only rename them to ‘ptCSwarmHash’ and ‘ptCPeerId’.
Note:
I try to keep to a readable but comfortable naming convention. Variables with known or assumed purposes will be named in lowercase with underscores, e.g. ‘buffer_length’. Variables with a specific type but unknown purpose will be named in Hungarian notation until a better name is found.
Now that we’ve done an initial review of the signature, let’s search for usages of our function, and see which variables are passed. This search reveals that there is only one usage.


What do we have here? A log message with our string starting a handshake! This proves again that we’re in the correct place.
The third parameter (after ‘this’ and ‘unreferenced’) that is passed by R8 is a fixed value of 0xe (14), so let’s rename it to ‘equals_0xe’. Remember, the ‘CPeerSock::SendHandShake’ is only called once, so this will always be the value. In this case I ended up leaving the name, but it would’ve been better to rename it to something descriptive when I finally understood what the 14 value represents.

Now the signature looks like this – much better!

Signature remarks
Let’s return to the ‘unreferenced’ parameter, specifically in the calling code:

Following our lead, Ghidra named the second variable ‘unreferenced’. Nevertheless, it could still be of interest – perhaps something important is passed, even if the variable isn’t used. The ‘unreferenced’ variable contains the function name, and is defined before a call ‘LogMessage’, but we can’t see a usage. This seems like a decompiler issue, likely related to how Ghidra parses the assembly into C++ pseudo-code.
Note:
‘LogMessage’ accepts a format string, and therefore is probably a variadic function (like ‘printf’). As Ghidra can’t extrapolate the number of parameters, in each reference to the function the decompiler fails. Instead of sweating over the assembly, I recommend guessing the number of arguments by the number of format arguments in the string.
But I digress; we should be focusing on our goal of ‘CPeerSock::SendHandShake’. Is ‘unreferenced’ important? Let’s review the assembly to find out.

The function name string address is stored into RDX and passed to ‘LogMessage’. Following this, parameters are set for ‘CPeerSock::SendHandshake’ (our function), without touching RDX. To conclude, the parameter is irrelevant; it merely contains the value from the previous usage.
The fact that this second parameter isn’t used looks like compiler optimization. Initially, I suspected that it chose not to call ‘CPeerSock::SendHandshake’ with the standard ‘fastcall’ calling convention, but I don’t believe compilers perform such optimizations. Furthermore, the fifth parameter is passed on the stack instead of in the fast register, so such an optimization would be wasteful, as writing to the stack is much slower than writing to a register. Another option is that in the source code, a variable is passed, but is not used internally by the function. In such a case, the compiler still passes the variable, but doesn’t bother to edit it, as it won’t be used. Surprisingly, in this case, the variable written in the source code is different from the variable that is sent in reality.
Anyway, this was a dead end. Such is the life of a researcher.

Note:
Personal frustrations aside, why am I digressing so much? I could just say to myself that it’s weird, and continue to my second goal of fuzzing the code. On the other hand, these internals can be critical to proper understanding – and hopefully, to bug detection. In your own work, if something feels wrong, or seems ‘off’, I encourage you to dive in, and research it. You never know what you might discover.
Handshake buffer formatting
Let’s return to our function, which starts by initializing a vector. Using the techniques mentioned in the “Reversing Windows C++ with Ghidra” guide, we can reverse the vector, and see that the function allocates 61 bytes, plus 14 (0xE) – in total: 75 bytes.

Returning to Wireshark, we can see that the first message is indeed 75 bytes long. More proof that we’re on the right track!

The function then starts storing information into the buffer. ‘equals_0xe’ is limited to 0xff, and stored at the beginning of the buffer. Then, the ‘Swarm protocol’ string is copied to the buffer, using the unlimited (!) length stored in ‘equals_0xe’. So: ‘equals_0xe’ is the string length, and indeed, the string’s length is 14.

This is weird behavior: if a longer value is passed, ‘memcpy’ may copy outside of the allocated boundaries.
(Un)luckily, the correct value is passed. Also, the ‘equals_0xe_limited’ parameter is stored to the buffer, but the original ‘equals_0xe’ is used to copy the string. We should remember this treatment when we encounter the opposite function that parses this handshake, we might find similar behavior that we can exploit.
At this point, I began to feel optimistic: we already found two bugs … surely we’ll find an exploitable one. From here, our reversing gets more interesting. The address after the newly-copied string is calculated, and multiple values are written into it.

Can you understand what’s being copied into what? Me neither.
Instead of manually defining each type, let’s use ‘Auto Create Struct’ to create a readable structure.
This elegant feature allows us to select a pointer, and automatically create a structure according to the usage of said pointer. Now, all that is left is to rename the new structure to ‘HandshakeBody’, and continue to investigate its values.

Now instead of modifying pointer offsets, an ordered structure is edited:

The first 8 bytes are zeroed. Surprisingly, Ghidra chose to cast our newly-defined structure pointer to do this. It does this because the assembly zeroes all the 8 bytes at once, and then sets the fifth byte to 0x10. I renamed it from ‘field_0x5’ to ‘set_to_0x10.

Next, the ‘ptCSwarmHash’ object is copied by value, using four intermediate stack DWORDs at a time. Let’s rename that section ‘DWORD adwSwarmHash[8]’.

Now our structure is clear – but ‘ptCSwarmHash’ isn’t. What we can see is that the code reaches into its variables when the structure’s size is 0. This isn’t relevant to our immediate purposes, so we’ll get to it later. ‘CPeerId’ is also copied, and it too is retyped to a DWORD array, as ‘CSwarmHash’ was.

That’s it! The buffer is completed, and passed on to ‘CPeerSock::_SendMsg’.

Back to Wireshark
We started this chapter from a clue discovered in Wireshark, and we’ll finish by returning to the network sniff and comparing our results to reality.
We already discovered that the handshake should start with ‘Swarm protocol’ formatted as a pascal string, with the following structure.

We can indeed identify ‘Swarm protocol’, prefixed with its length of 0xe.
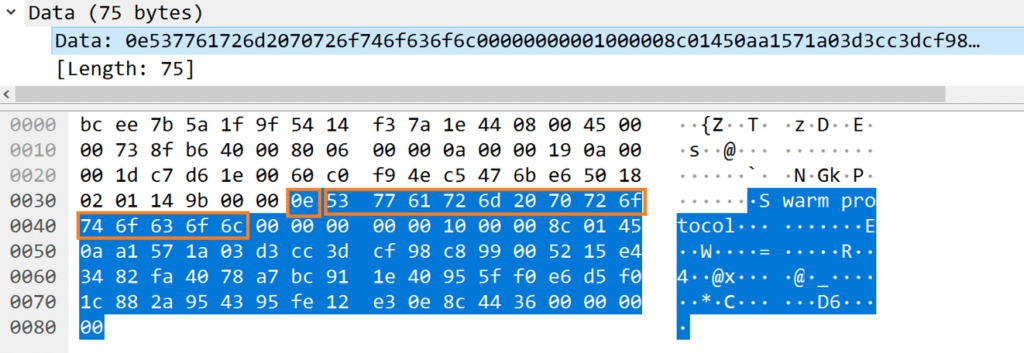
The 0x10 magic also appears here.

According to the findings, the next binary values should be a 32-byte hash, followed by a 20-byte peer ID. And indeed, the leftover buffer can be split into a 32-byte array followed by a 20-byte array.


‘CPeerSock::_SendMsg’
The function ends with the network buffer being sent to another of the class’s methods: ‘CPeerSock::_SendMsg’. Initially, I attempted to find additional usages of the function, hoping to find other message formats. After a few attempts I abandoned this path, as even with symbols, I couldn’t understand the meaning of the sent messages and parameters. Instead I came up with a better idea: to search for the code on the opposite end – the end that receives the buffer and parses the messages from it. Such a function would be superior for full coverage, and there may be multiple messages sent from all over the code – and potentially even backward-compatible messages that are not sent at all. Such backward-compatible messages may even allow us to break things.
Before jumping to those functions, we need a broader understanding and context of the code in order to understand the usages of different messages, and their internal variables.
Conclusion
In this chapter, we began the reversing process. We entered the code using a string we found in the black box phase, and successfully reversed the structure of the peer-to-peer handshake. We went somewhat overboard for educational reasons, and to demonstrate the power and features of Ghidra.
As far as our goals go, we began to understand the peer-to-peer protocol, and added a tactical goal of finding the receiving end of the message parsing. As we focused on just one function, we still need to get a general understanding of the overall code.
Stay tuned, because in the next chapter we’ll continue trying to achieve these goals. In Chapter 3 Part 2, we’ll get a broader understanding of the code as a whole, and will extract the information we want from multiple functions, while at the same time trying to minimize effort and streamline the research process.
Navigation to previous and further chapters:
- Chapter 1 – Introduction
- Chapter 2 – Black Box Research
- Chapter 3 – Reversing DoSvc with Ghidra (Part 1 + Part 2)
- Chapter 4 – Network Analysis
- Chapter 5 – Fuzzing
RELATED ARTICLES


CrowdStrike Fallout: Navigating the Risks of Intrusive Security Tools
Learn how to balance robust cybersecurity with operational stability in the wake of the CrowdStrike outage.

China-Nexus Threat Group ‘Velvet Ant’ Leverages a Zero-Day to Deploy Malware on Cisco Nexus Switches
Sygnia uncovers the China-Nexus group ‘Velvet Ant’ leveraging a zero-day exploit (CVE-2024-20399) on Cisco Switch appliances, escalating evasion tactics to maintain long-term network persistence.

What is a Rootkit? Exploring the Hidden Threats and Their Impact on System Security
Learn what Rootkits are, how sophisticated threat actors leverage them to gain full control of computers and systems, and how to protect your systems from this unique risk.

By clicking Subscribe, I agree to the use of my personal data in accordance with Sygnia Privacy Policy. Sygnia will not sell, trade, lease, or rent your personal data to third parties.