
Chapter 2 – Black Box Research
The intricacies of WUDO (Windows Update Delivery Optimization).
Why start with black box?
We tend to start with a black box approach each time we begin a research project. Although it is not as prestigious as reverse-engineering binaries to find CVEs, it is nonetheless a critical step after reading the documentation, as black-boxing gives us a general grasp of the situation. This allows us to sharpen our focus for the heavier, more time-consuming tasks like reversing, enabling us to concentrate on features and areas within the code to reverse. A good analogy for this is to imagine that Windows is a patient who we are diagnosing: black-boxing is the step of measuring the patient’s blood pressure, or CO2 output, while reversing is open-heart surgery.
Our first goal in this stage is to hunt for low-hanging fruits to exploit – perhaps even finding some CVEs, if we are creative enough. This also helps us to reach a high-level understanding of how DO works de facto, and to choose what parts and aspects of it we need to research next.
With the benefits of black-boxing in mind, I began researching DO (Delivery Optimization) as a Windows OS black-box, searching for processes, services, ports, and analyzing communications.
Spoiler alert: The black-box research indeed helped us to validate that we need to invest effort and place focus on the network-related aspects of DO.
Service
Services are a major component in Windows environments, especially for such features as DO, as it manages system resources. As such, one would assume that DO will run as a service, or as part of another service.
And indeed, by listing available services using ‘services.msc’, I discovered the ‘Delivery Optimization’ Service – also discoverable using the command line ‘sc’ – or any other tools you like.
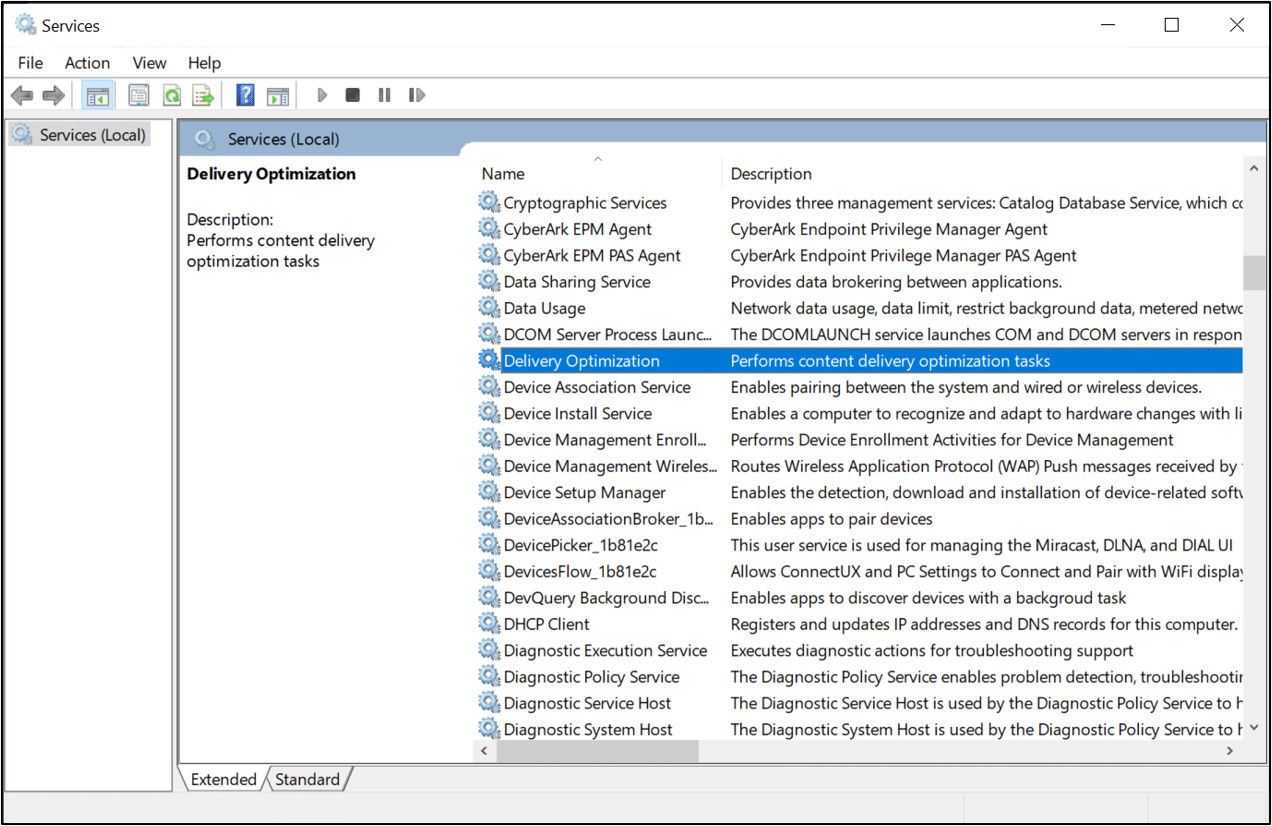
Let’s review the service’s settings:
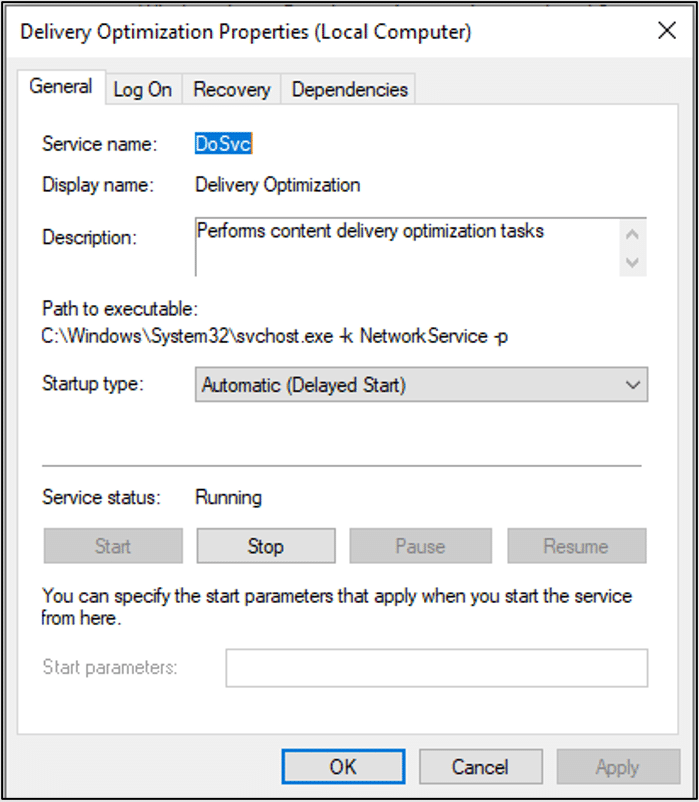
The service’s name is ‘DoSvc’. We use ‘DO’ as an acronym for Delivery Optimization – and apparently Microsoft does the same. This could be useful if we encounter it in the future without other, easier strings.
Service configurations are stored in the registry at
‘HKEY_LOCAL_MACHINE\SYSTEM\CurrentControlSet\Services’.
Let’s check for intriguing settings:
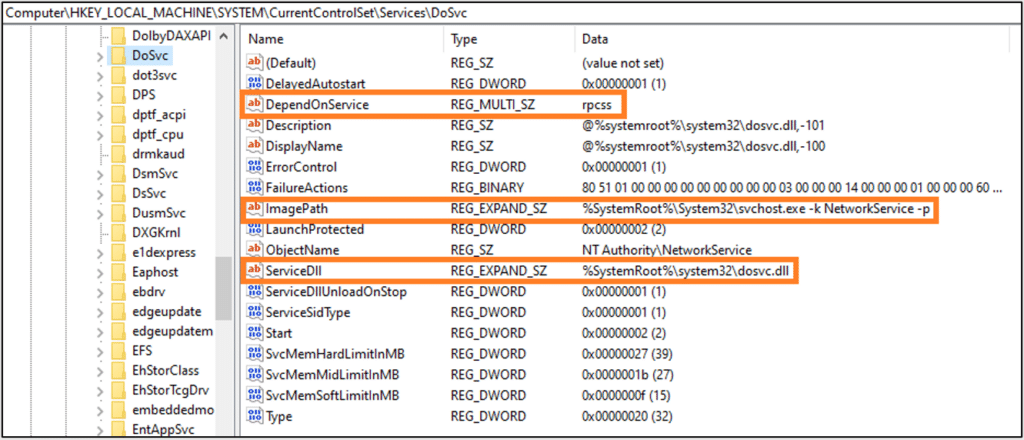
From here we can learn the following information:
- The DoSvc service is dependent on rpcss – it uses DCE/RPC
- DLL path – %SystemRoot%\system32\dosvc.dll
- Process – %SystemRoot%\System32\svchost.exe -k NetworkService -p
Process
Now let’s find the service’s process in ‘ProcExp’. Luckily, from Windows 10 Creators Update (version 1703), each service DLL is separated into its own svchost.exe process.
In the past, many services were grouped into similar privileged host groups, and loaded to the same process. This was intended to save resources, but came at the cost of security (services shared the same virtual memory) and stability (if a service crashed, the process crashed, dragging down the rest of the services). In this day and age, resources are not as scarce, so services were separated into their own safe processes.
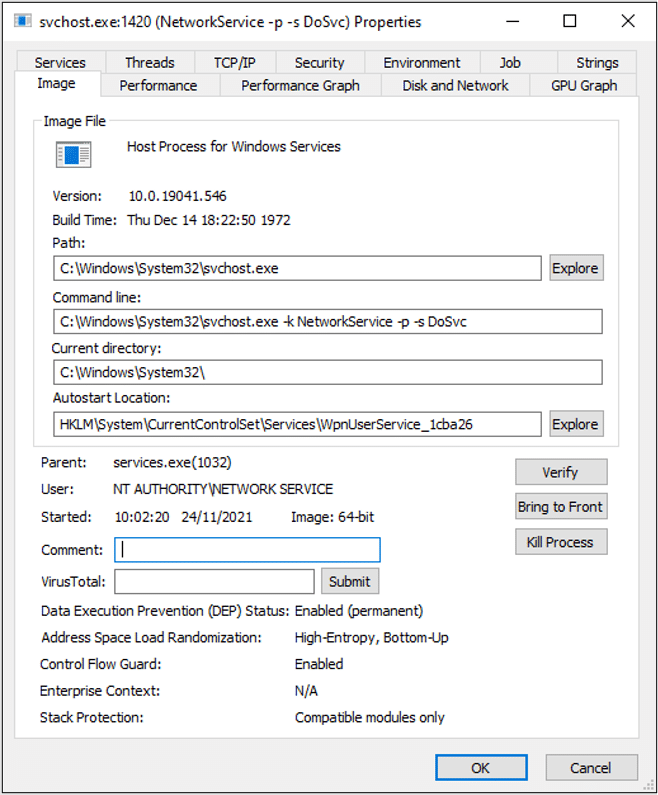
What about the security tab? Let’s review the context in which it runs.
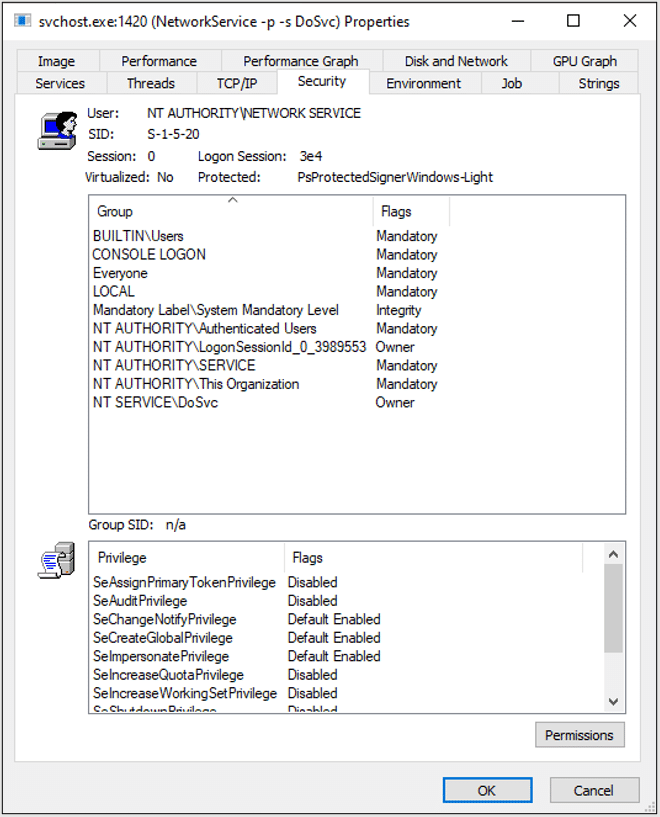
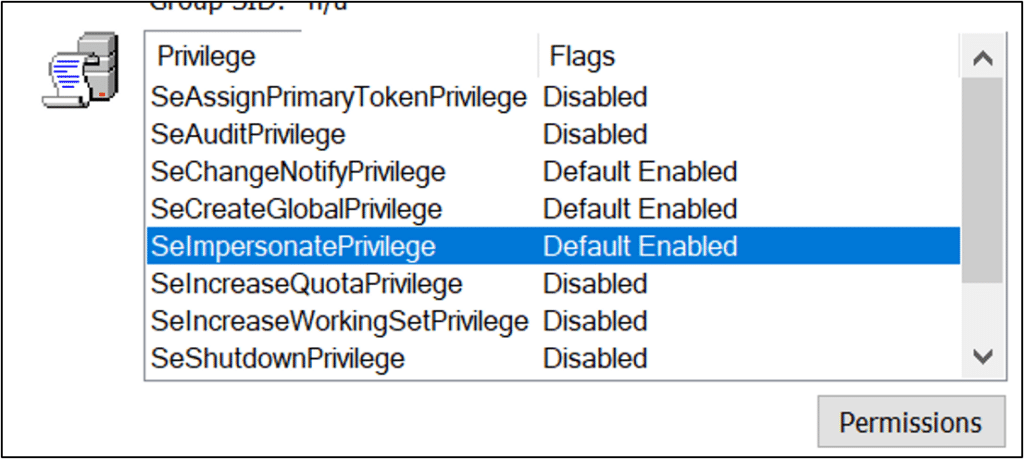
The process runs under ‘NETWORK SERVICE’, without many permissions. You might be thinking that even if we did find an RCE, we would need to perform a Privilege Escalation for full exploitation of the host. As luck would have it, this service had the ‘SE_IMPERSONATE’ privilege, which allows any thread to impersonate a system process – for example, ‘services.exe’.
Network
Keeping in mind that this network service is supposed to communicate with other machines, I wondered: which ports does it use? To find out, I fired up an updates search, while watching the network activity of the process.
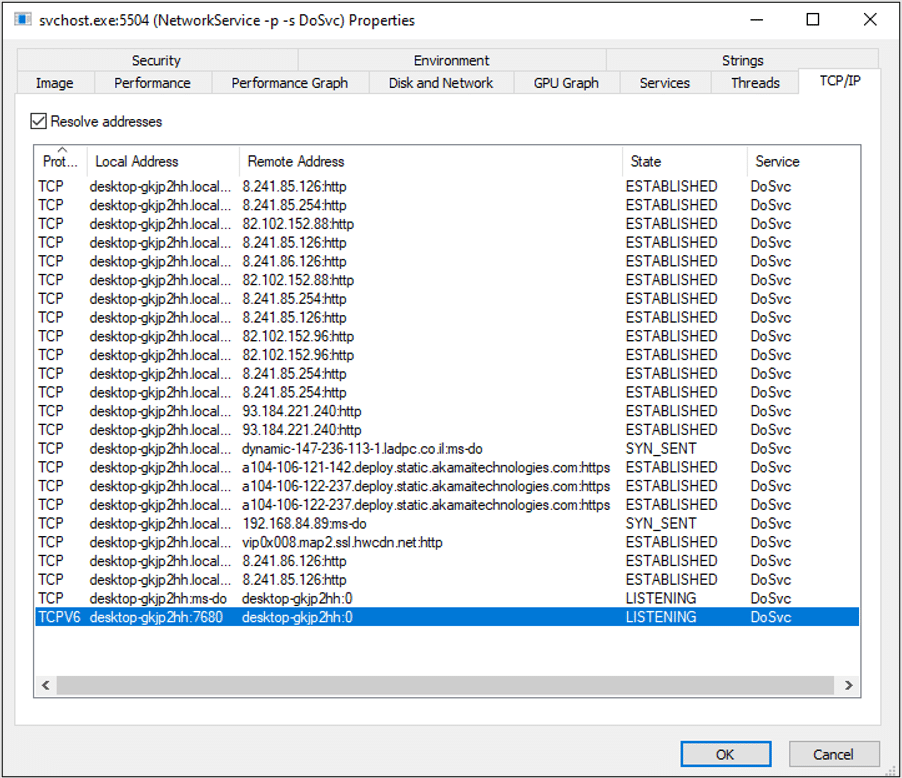
This search showed that the process has multiple interesting network activities.
Inbound communications
The process listens for inbound TCP connections on port 7680 (ms-do) over IP4 and IP6. Awesome, this is probably the protocol used for file sharing. I wondered: what is sent over this protocol? And more importantly: how can we exploit it?
Outbound communications
The DO process communicates with multiple web servers over both HTTP and HTTPS. It is surprising to discover an unsecure HTTP communication, so again, I wondered: can we exploit this?
The process also connects to a WAN IP using port 7680 – which isn’t surprising, as it also listens on the same port, but this validates that no network manipulation or port forwarding is used for the WAN connection.
Registry
Registry keys are also very important, as they contain configurations and store context. Searching for strings in ‘RegEdit’, I found multiple keys.
DO uses COM objects from ‘domgmt.dll’, which shows us that DO exports a COM interface that allows other processes to request actions. This could allow remote control, potentially leading to a new attack surface.

DO configuration is found in the following registry path:
‘HKU\S-1-5-20\SOFTWARE\Microsoft\Windows\CurrentVersion\DeliveryOptimization’.
Now, let’s delve into its keys.
The ‘Config’ key contains some URLs and enums – although for now, we can’t understand what each number represents in each enum.

Same for the ‘Settings’ key: we could play with the settings to understand what ‘DownloadMode’ is, but we won’t really learn much from trying.

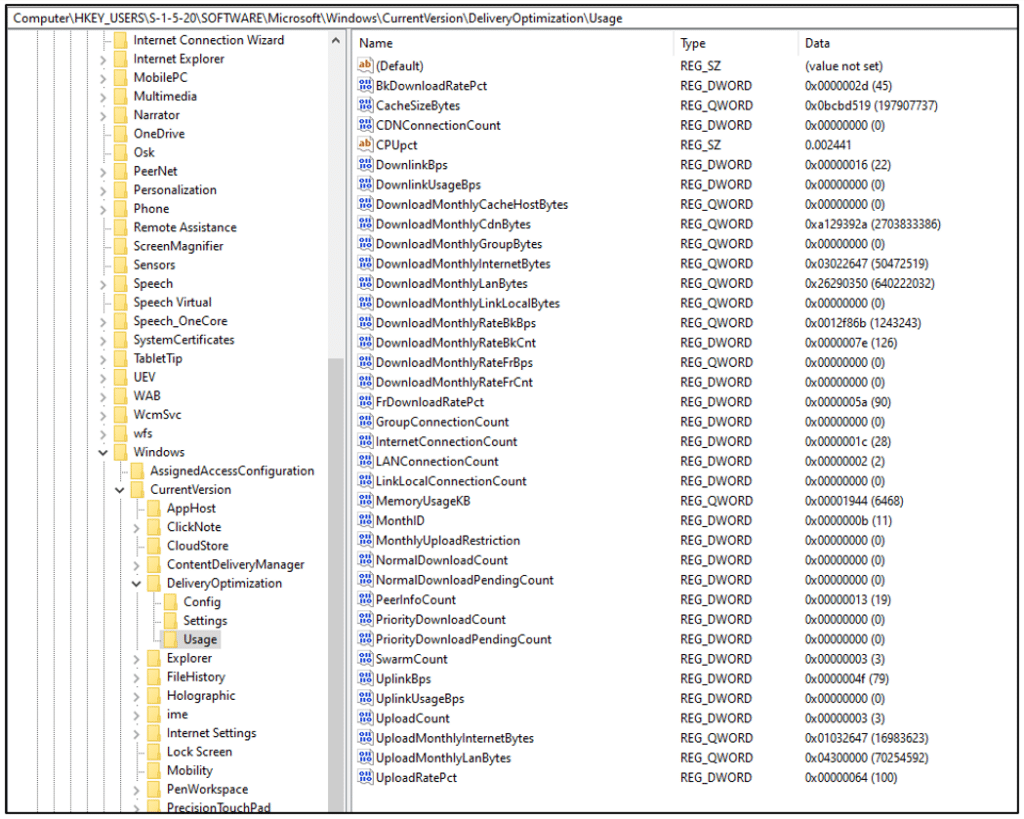
The ‘Usage’ key, however, is very interesting: it contains metadata of bandwidth usage! In Chapter 1, we found this data in the GUI; it turns out the information is stored here, in the Usage key.. This is useful knowledge, because if we want to create our own DO wrapper, we can access the usage data from here.
Files
Using my favorite searching utility, ‘Everything’, I discovered files in:
‘C:\Windows\ServiceProfiles\NetworkService\AppData\Local\Microsoft\Windows\DeliveryOptimization’.
To fully access the files, I had to stop the DoSvc service and copy the folder as SYSTEM, or use shadow copy. The folder contains three sub-folders:

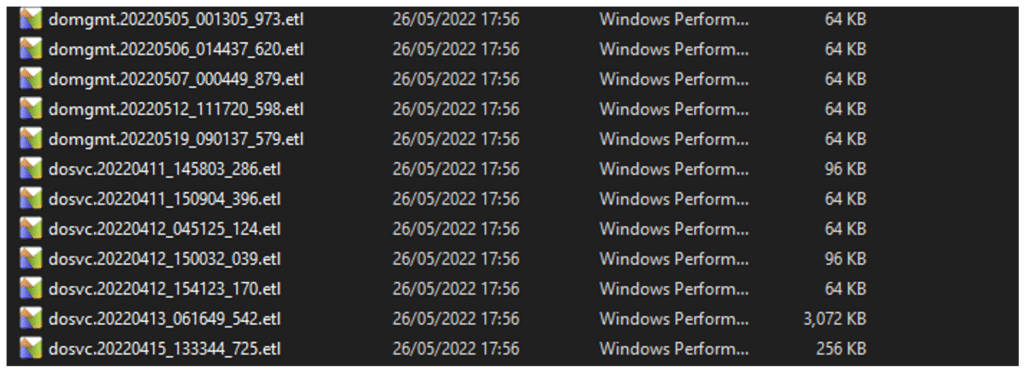
Logs
The Logs folder contains event logs. I won’t cover the logs here, as the following chapters provide a better description of the flow. For more information about DO log research, see:
https://2pintsoftware.com/news/details?objId=161
State
The State folder contains a database about, well, the state of DO.

I opened ‘dosvcState.dat’ and discovered the following header:

This header indicates that the file is a registry HIVE backup – the type you create using the ‘reg save’ command. I loaded the file into a temporary registry path and discovered that it holds information about Jobs and Swarms.
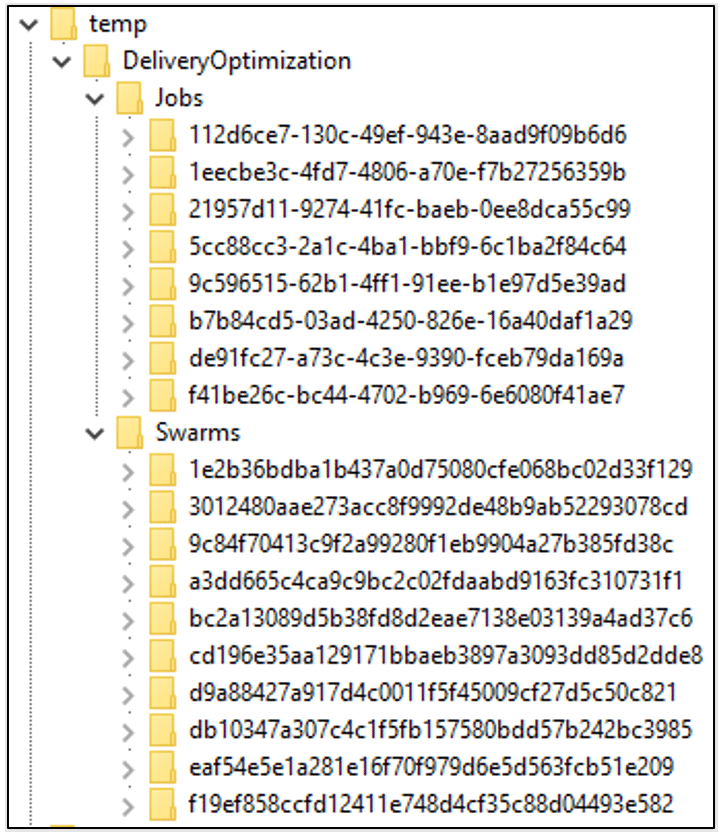
This was a bit strange to me, as we had already searched the Registry – how could I have missed this? I searched the registry once again, but could not find these keys. This folder is called ‘State’, and the file is called ‘dosvcState.dat’, so this is probably the actual state, and not just a backup. Seems weird to store it as a registry backup but who am I to judge?

Let’s inspect the first Job. It contains three files, each with identical values. Let’s review the first file.
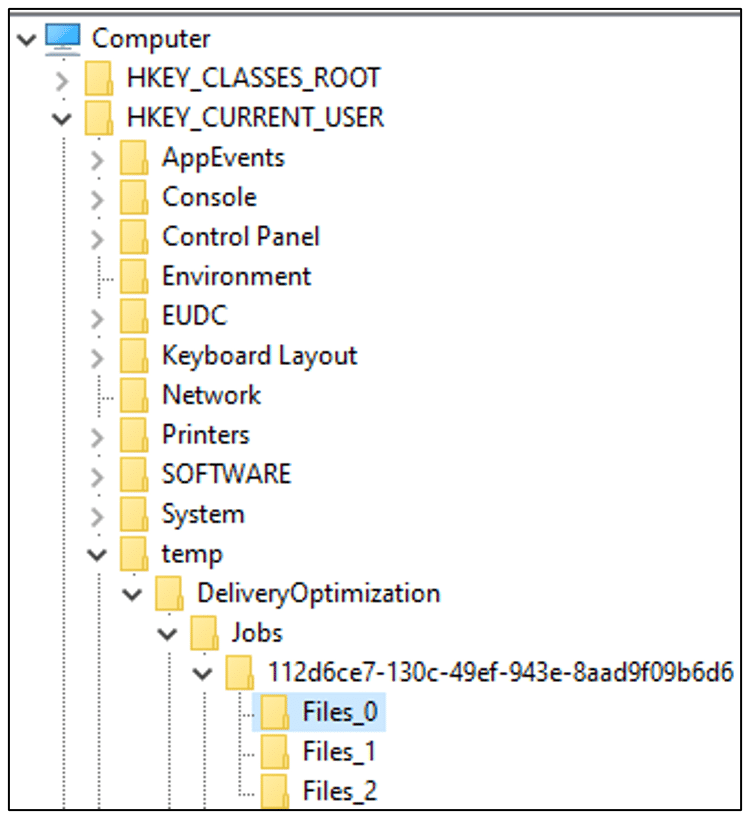

- FileId – From the length, this looks like a SHA1 hash. (More on this in Chapter 6.)
- LocalFile – The local file path. From the name, we can infer that this is the KB5010342 patch! Good to see that we are in the right place.
- RemoteFile – This gibberish string should be a remote path. Perhaps it’s encoded data for the peer network? Maybe a URL?
Note that the first few characters show a pattern: ‘Ðèèàt^^’
This pattern is the same for each key’s RemoteFile, which reminded me of another common string: ‘http://’.
Perhaps it is an obfuscated URL?
While this cryptographic challenge intrigued me, I went for an easier solution. In the next reversing stage, I searched for obfuscating functions, and found this:
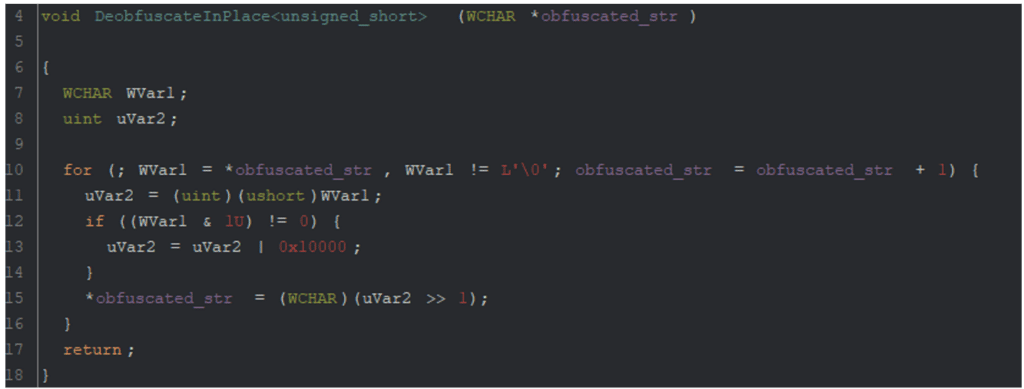
I rewrote it in Python:
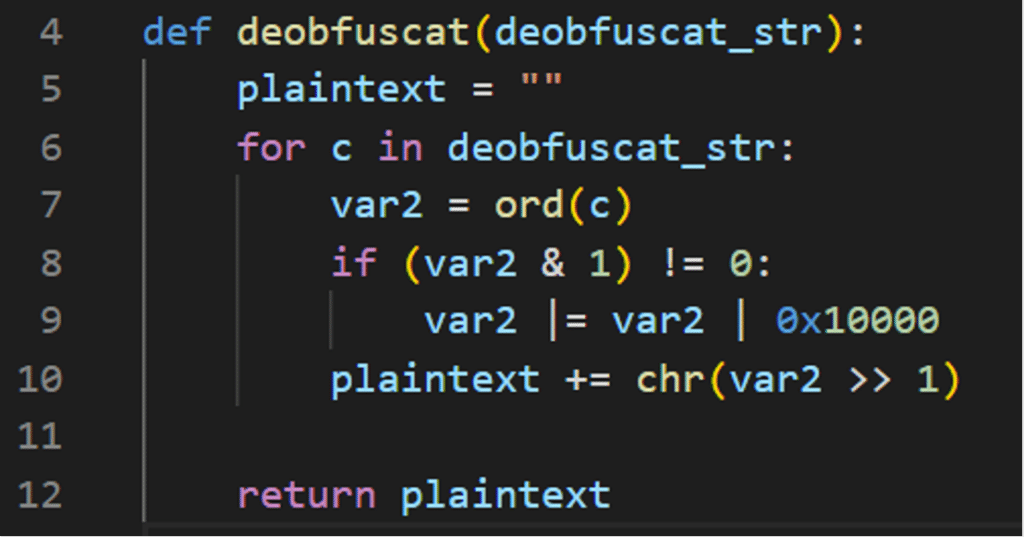
And the obfuscated string was successfully translated into a URL, from which I managed to download the update myself.
‘hxxp://2.tlu.dl.delivery.mp.microsoft.com/filestreamingservice/files/3c76bcd7-1357-4e18-8dbb-0cf766d529da?P1=1655820364&P2=404&P3=2&P4=bhsoTp9EZSC4sHoV1EFxosLGJB9CTe0BX5eRj48ulmvZnzCsKdCPbjAQWs4yK9ZPu%2fMl6PYGsV7DvURq2ULHog%3d%3d ‘
What about the ‘Swarms’ key?
For each Job file, there is a parallel key under ‘Swarms’ correlated by the ‘FileId’ value. For example, for the file from the ‘Job’ above:

Awesome! This is information about a single download, including peer data! Let’s examine the important values.
- Caller info
- CallerName – Is ‘WU Client Download’, meaning this is a download for Windows Updates. DO is used by multiple Windows features – in this case, the updates mechanism.
This is interesting, as sometimes Microsoft uses the term WUDO (Windows Updates DO), but usually just uses DO. Perhaps initially it was only intended for updates, and was later split off, allowing different callers – including ‘WU Client’.
- CallerName – Is ‘WU Client Download’, meaning this is a download for Windows Updates. DO is used by multiple Windows features – in this case, the updates mechanism.
- File metadata
- CdnUrl – RemotePath from above.
- FileSize – This file size is 656,120,729. Assuming the size is in bytes, that’s a big file! You can understand why Microsoft would want to reduce download bandwidth.
- WorkingDir – Local downloading directory; see the following Cache section.
Leaving the best for last, there are values with peer information! The peer values are more mysterious … let’s try unravelling them together.
- PeerCount – Perhaps the number of peers from which the file is downloaded? Was this file downloaded from a single peer?
- PeerId – Is this the identifier of this machine’s peer? Perhaps it’s a peer of another peer – but this is unlikely, as there is only room for one.
Note the four null bytes at the end … perhaps these are padding?
Jobs and Swarms
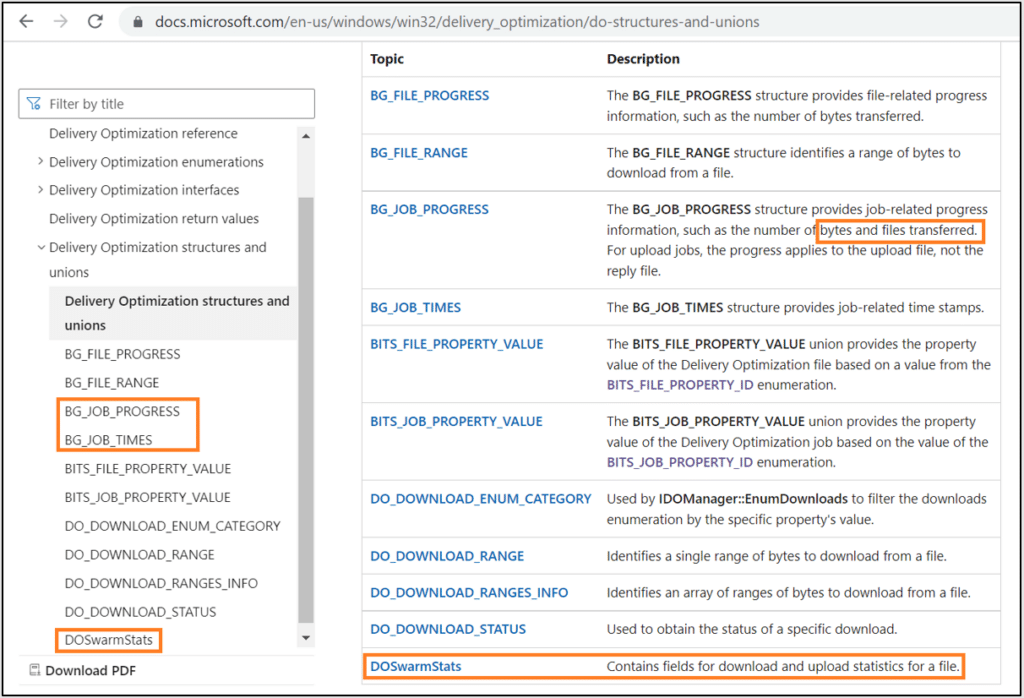
Rereading through the docs, we see that a Job is the term used for a batch of downloads, and a Swarm is the term used for a single download. Nice, this fits in with our findings. It is reassuring to find correlations between our deductions and the documentation.
Do all Swarms belong to specific Jobs?
There are multiple Swarms that do not exist in any Job – actually, in some ‘dosvcState.dat’ samples there are only Swarms, and no Jobs. Orphan Swarms are problematic, as they do not contain plaintext values that clarify which file they represent. This data is stored under the Job, but not the Swarm.
Identifying Identifiers
At this stage, we have multiple identifiers. Each Job key is a GUID, and each file contains a ‘FileId’ that is a SHA1 hash. For Swarms, each key is a different SHA1 hash. Swarm keys have a correlating ‘FieldId’, a ‘HashID’ field that is a SHA256 hash, and a binary ‘PeerId’.
At this point, we have to decide whether we should try to understand these fields, or let them be. They may be the hash of something important, but they may just be random identifiers. We could try hashing the update itself, or searching for the identifiers in other sources. A quick-win option is to enter the hashes into VirusTotal, to see whether they might have been scanned and stored. In this case, I chose to put them aside and continue. If and when they will become relevant, we’ll spend time looking into them. In this article, we will get to some of the hashes that we investigated, and we’ll cover more of them in the following articles.
Cache
Now the only thing missing is the most important part: where are the downloaded files? Maybe the ‘WorkingDir’ value found inside each Swarm, which points to a folder inside the Cache folder, will help us find them?
Documentation
As obvious as it may sound, it must be said: often in research, we encounter situations that can be quickly understood by using the documentation, or less quickly understood by ignoring it. If you ever want to hear a good story, find the closest Researcher, and ask him about that time he ignored the documentation.
With this in mind, before jumping into the cache directory, let’s take a documentation interlude. Obviously, this is nothing new, as we read all the documentation listed in Chapter 1, so I’m not telling you anything you don’t know already 😉.
In the first stage, the file’s metadata is downloaded. Each file is split into pieces (each piece is typically 1MB), and the SHA256 hash of each piece is provided to prevent peers from ‘accidentally’ sending the wrong piece.

Back to the black box
The Cache folder contains a folder for each Swarm.
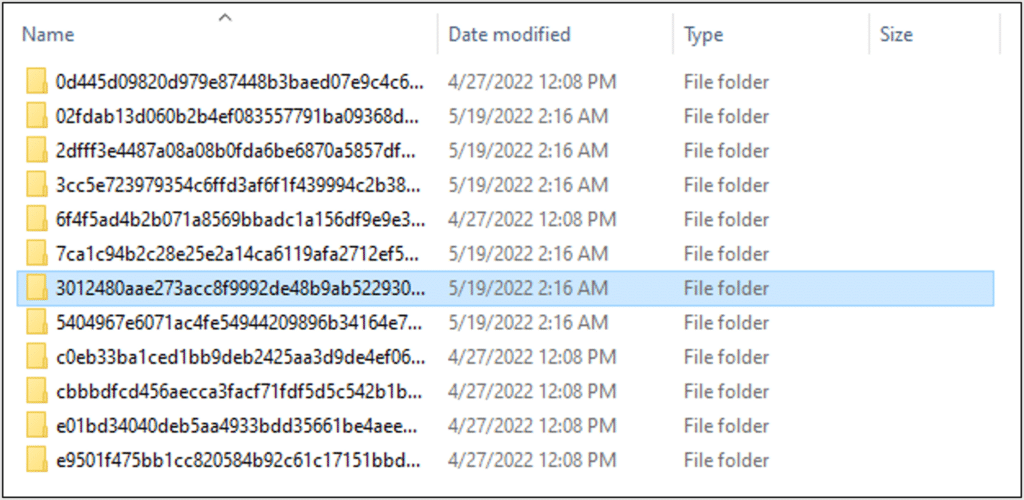
Inside each folder are two files: ‘content.bin’ and ‘content.phf’.

From the size of ‘content.bin’, we can guess it’s the downloaded file. Let’s inspect it.
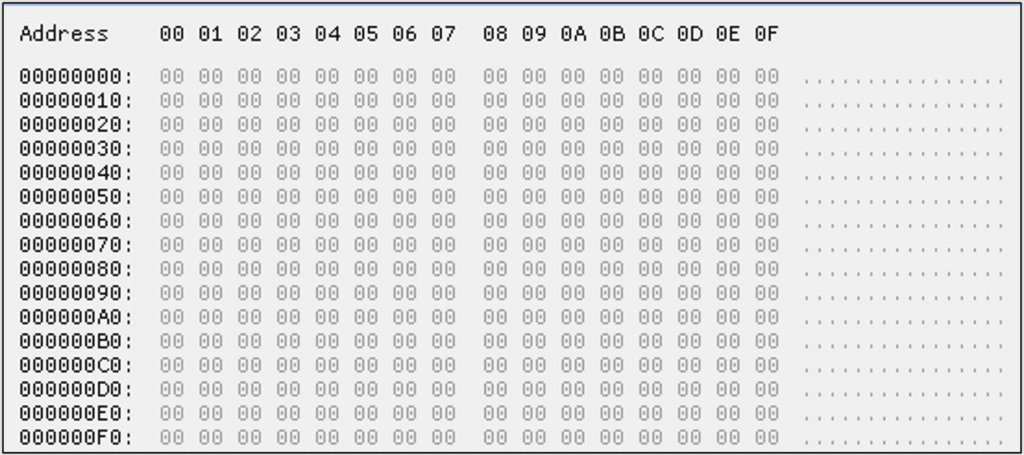
Full of null bytes. According to the Job data, this should be a CAB file, but maybe it wasn’t downloaded yet.
It makes sense to first reserve the disk space, and then download the file. We know that torrents download different parts of the file separately; maybe the same technique is used here, with the different pieces joined together in this ‘content.bin’ file.
Let’s continue to ‘content.phf’. It seems to contain metadata about the content being downloaded.
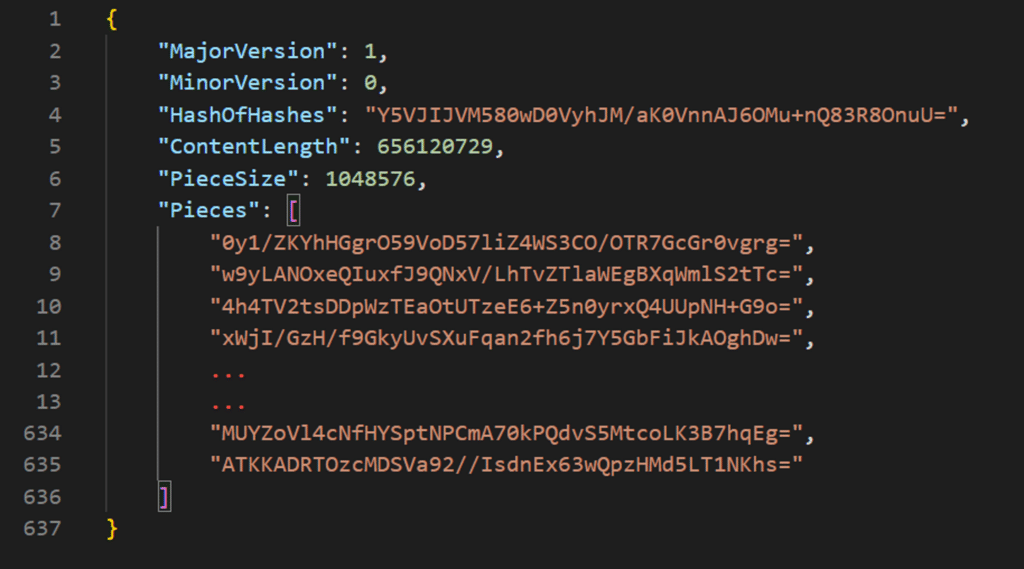
We see here that the content is split into pieces. Each piece’s size is 1MB, just like the documentation claimed.
There is a list of pieces containing encoded base64 strings. Combining this with the documentation shows that they are probably SHA1 hashes of each piece.
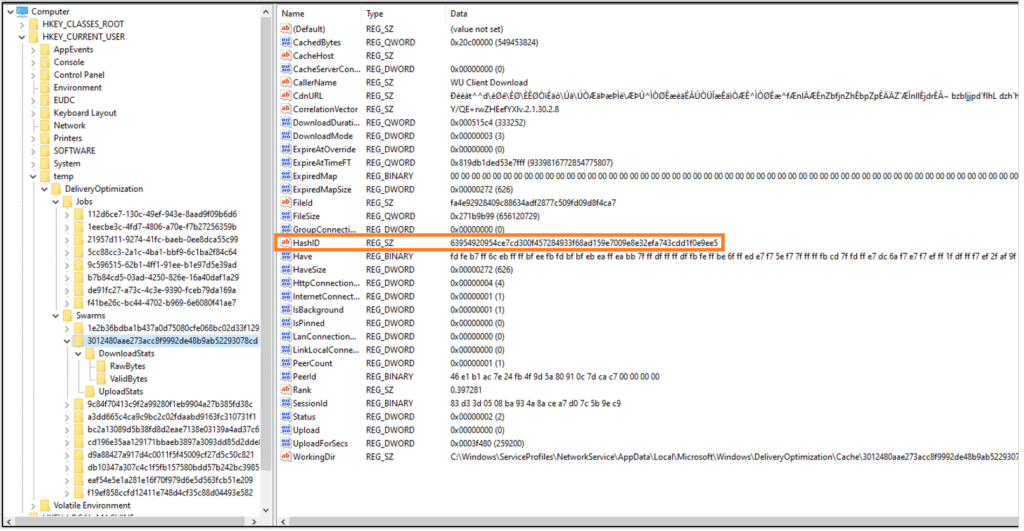
The most important key here is ‘HashOfHashes’. Interesting name, right? I wonder what it represents, and from which hashes it was computed – the piece hashes? By decoding it from base64 (and hex encoding for readability), we get the familiar string:
‘63954920954ce7cd300f457284933f68ad159e7009e8e32efa743cdd1f0e9ee5’
Doesn’t look familiar? It’s the ‘HashID’ from the Swarm key!
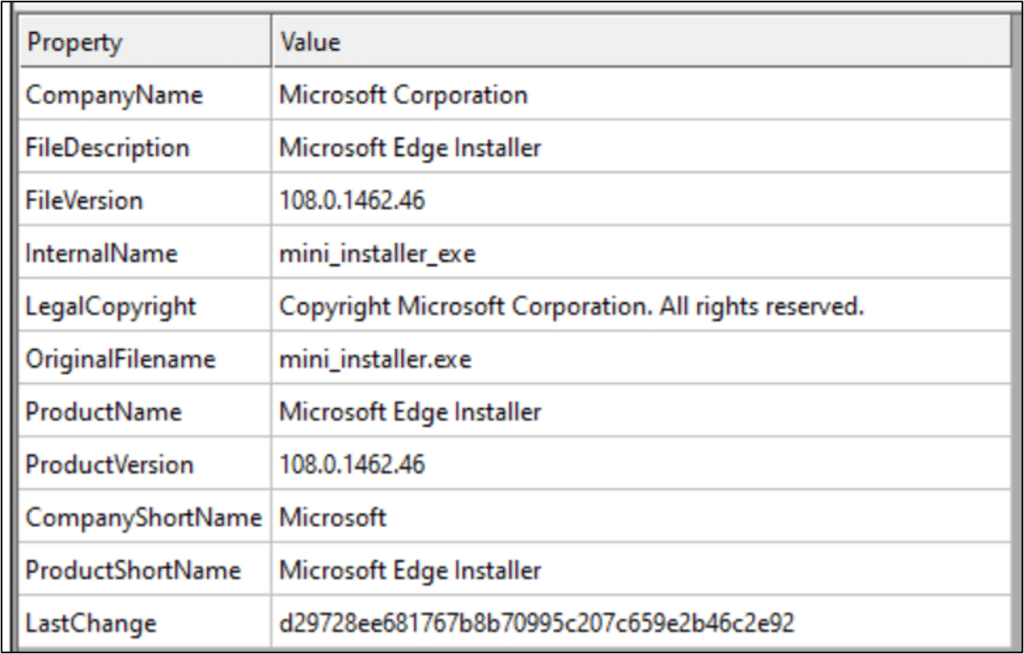
I was not satisfied with the null bytes found in ‘content.bin’ – give me a real update! I continued to other folders inside the ‘cache’ folder, and inside another update folder I discovered the following file:

Awesome, a PE file! Unfortunately, it was partial – probably not completely downloaded. It had enough pieces to load into CFF explorer, which shows that it is an Edge update.
Network
Now it’s time to do some network analysis. Above, we discovered that the service is waiting for inbound connections on port 7680, and connecting to remote servers on said port. I reset my VM to an early stage without updates, began sniffing with Wireshark, and searched for new updates in the update settings.
Within minutes, I sniffed multiple TCP streams. They were binary, with a ‘Swarm protocol’ text string prefix.

As I had never encountered such a protocol before, I began by Googling for ‘Swarm’ protocols, and was caught by surprise by what I found.

Wait, what? Is Windows using the Ethereum blockchain to distribute updates?
Ethereum Swarm is a peer-to-peer protocol. In the past, it was based on a devp2p underlay protocol, and today it uses libp2p. Unfortunately, the TCP sessions I sniffed did not match either protocol.
Note: Decision time! Should we try dissecting the binary protocol?
Understanding a binary protocol is a unique challenge that requires experience and creativity. It can be done, but in this case we already know which Windows service and therefore which binary code is responsible. I chose instead to put this mystery aside, and wait for the reversing stage.
TLS MITM
According to the documentation, the DO is cloud-managed, and not completely decentralized.

To better understand the Swarm peer-to-peer, we need to delve into the communications with Microsoft’s servers.
The documentation provides us with a list of servers.
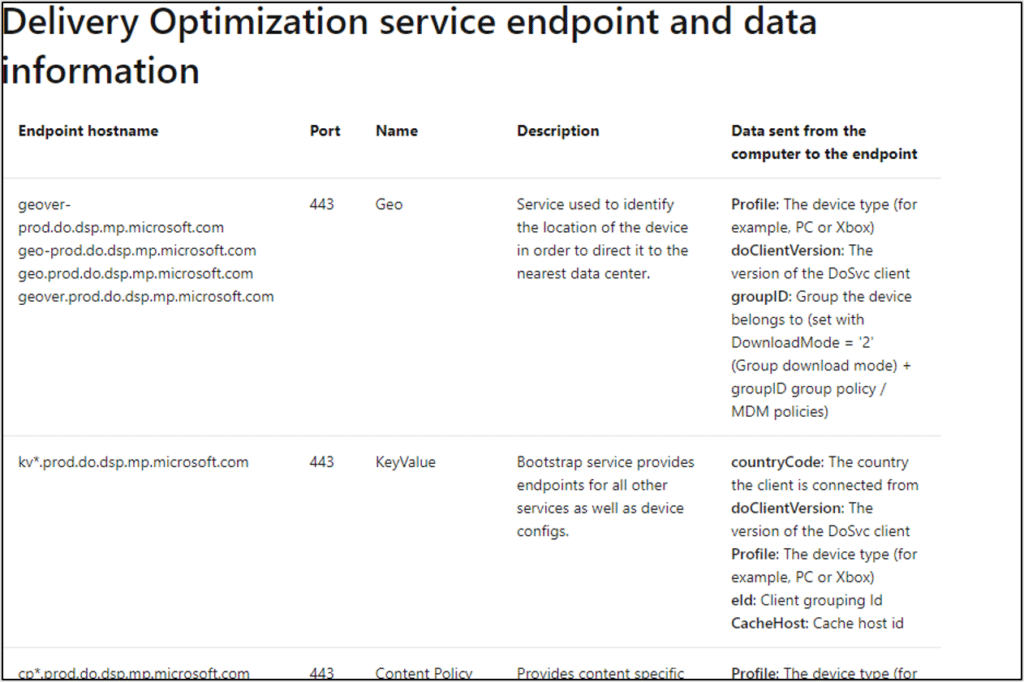
Now we have a list of documented HTTP and HTTPS servers that are a critical component in the peer-to-peer network. I wonder which information is passed to and from them? What private data is uploaded to Microsoft servers? To answer these questions, I decided to TLS MITM them. There are two ways to do this:
- Forward all of the computer’s network traffic to a proxy, and filter it there.
- Forward only the relevant traffic to the filter.
The first option is easy to implement using the built-in proxy client.
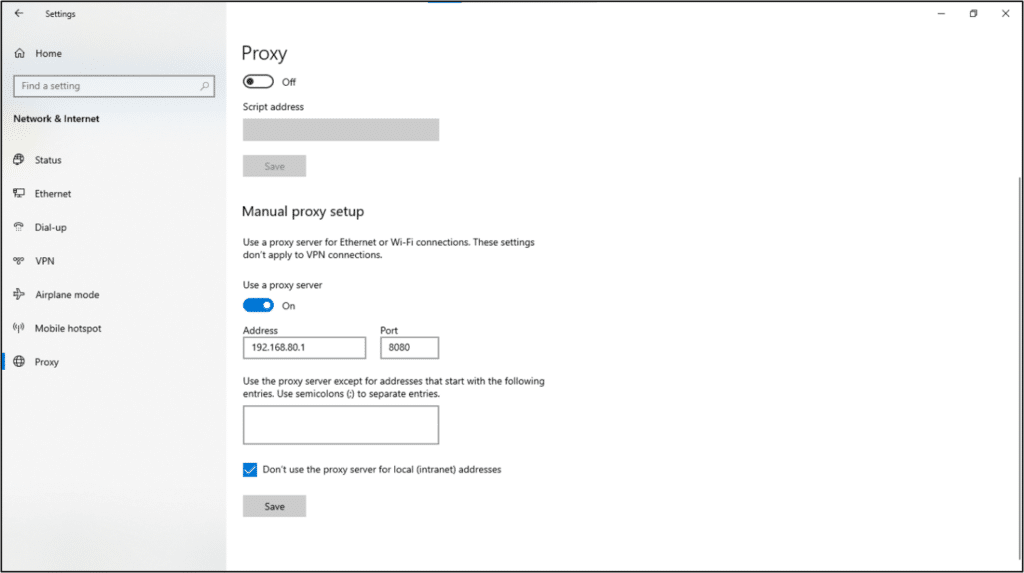
The advantage of using the built-in proxy is that this is how Windows wants you to proxy, so we can expect less interference. On the other hand, other methods are hacky and/or violent, and in general might not work on EDRs or protected processes. The downside of that proxy method is that all of the host network communication will be forwarded to our proxy, without any way to filter or highlight the DO-related communication. I can manually analyze all network communication and determine its relevance to DO, but it will be very ineffective and time-consuming, and there are better options. The proxy server will have to filter somehow. Luckily, we have a documented list of servers!
At this point, my paranoid side asked: Do we trust the documentation? What if we miss an important server? What about non-HTTP, HTTPS traffic? If we don’t filter by hosts, what else could be done?
My proxy solution was to not filter everything, but also not to limit to specific hosts. Instead, I chose to filter all the communications from the DO service’s process. For the client-side proxy, I used ‘Proxifier’, which allows filtering by PID.
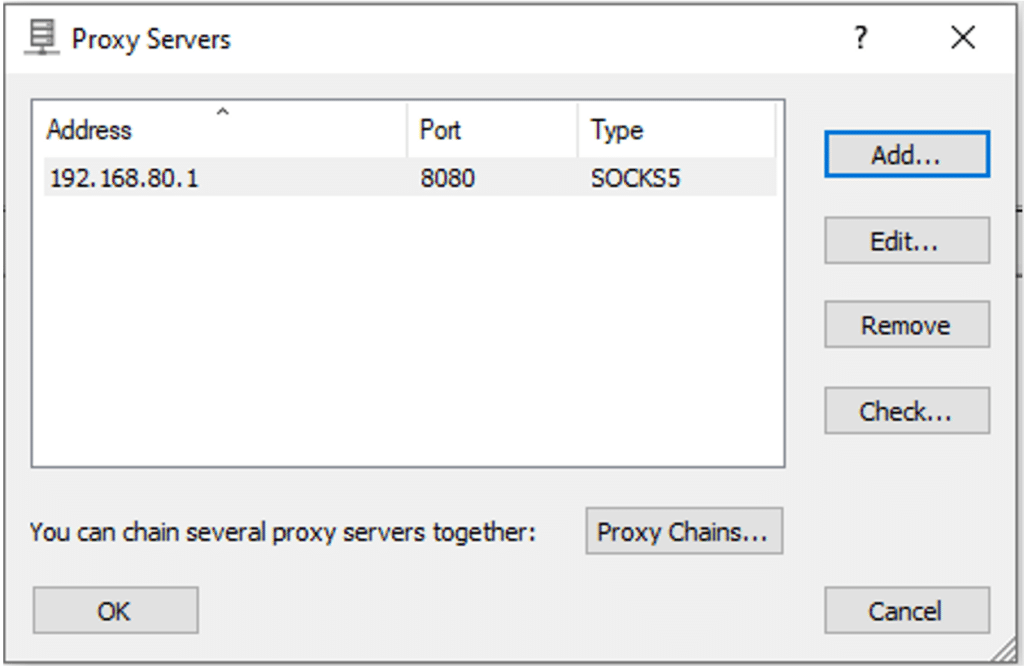
To discover the PID, I tried (unsuccessfully) searching by command line or loaded DLLs:

After several frustrating attempts, I remembered that the process is protected by PPL (Protected Process Light). The above ‘ProcExp’ succeeded using its driver to retrieve the command-line and loaded modules, as PPL does not protect against kernel access. However, the PID can be found by searching for the service itself, which was an elegant way to completely bypass PPL.

And finally, we can limit the proxying!
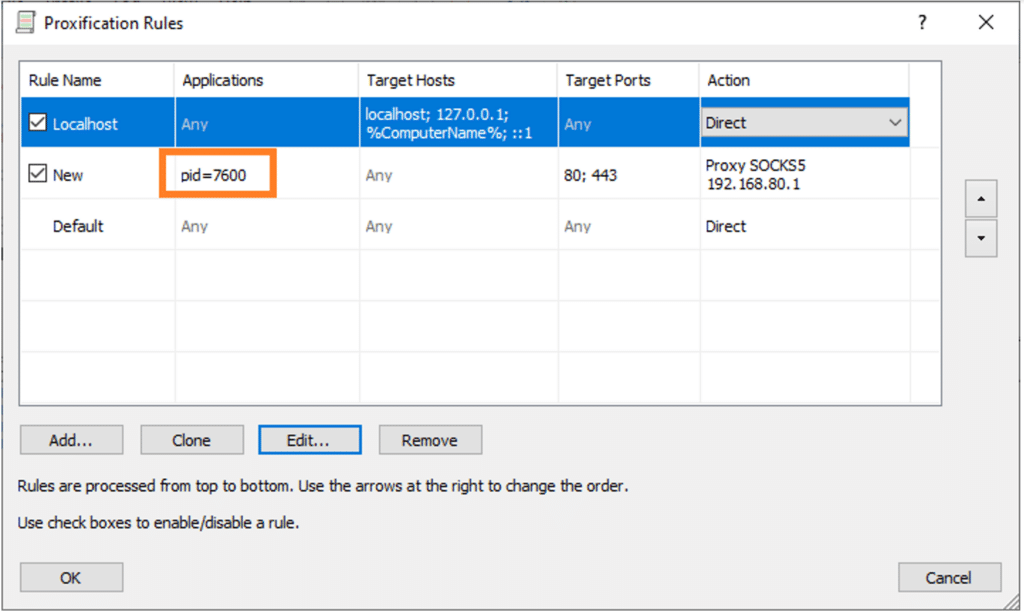
To continue with the MITM stage, I chose ‘Mitmproxy’, which turned out to be an easy and useful tool. It creates an HTTP or SOCKS proxy, opens all TLS traffic, and generates a root CA certificate that can easily be installed.
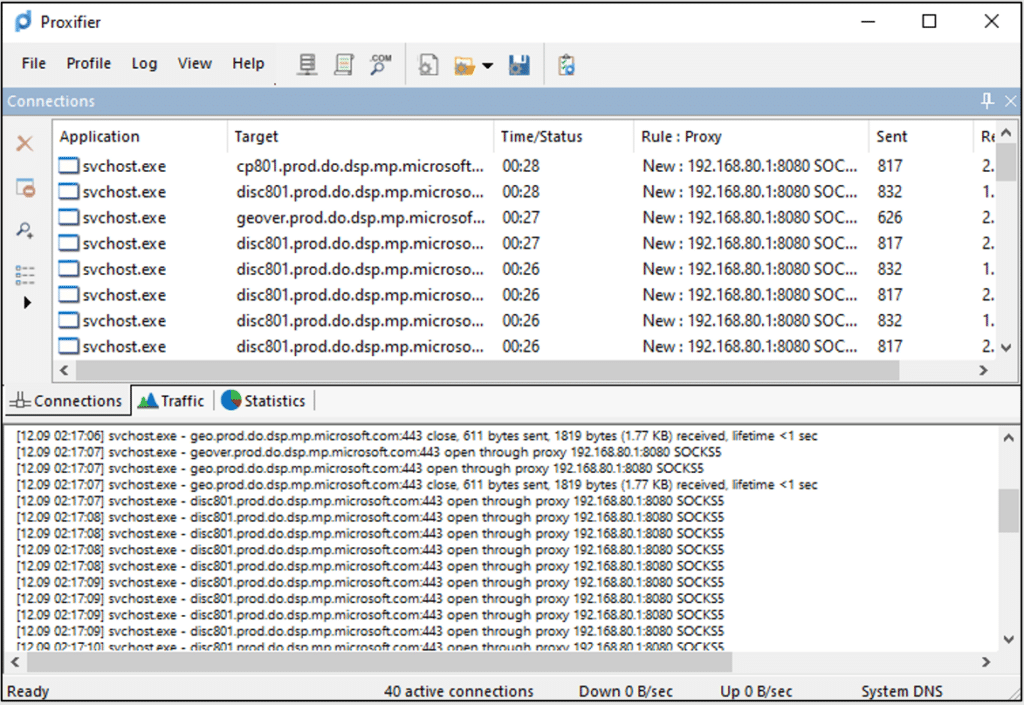
I executed Mitmproxy using the web interface, using SOCKS5 (because ‘Proxifier’ does not support HTTPS over an HTTP proxy):

The result shows that Proxifier captured domains which indeed appear in the official docs:
In Mitmproxy, we received opened TLS traffic. Here you can see a Join request, which will be analyzed in Chapter 4:

Summary
So, what did we discover as a result of our black box research?
- Delivery Optimization runs as a service called ‘DoSvc’.
- DoSvc runs with low privileges, but could escalate to SYSTEM.
- Files are represented by Swarm objects, and multiple downloads can be done in one Job.
- DoSvc listens on port 7680 for some Swarm protocol that we do not yet understand.
- DoSvc connects to Microsoft servers using HTTPS – according to the docs for metadata and peer information.
- DoSvc settings are saved in the registry and in registry archives.
- DoSvc has a COM interface.

By clicking Subscribe, I agree to the use of my personal data in accordance with Sygnia Privacy Policy. Sygnia will not sell, trade, lease, or rent your personal data to third parties.


